
Smooth, colorful royal icing can turn a simple batch of cookies into polished treats for holidays, birthdays, and celebrations.
Its fast-changing texture can feel tricky at first, especially because any icing exposed to air begins forming a crust.
Once you use pasteurized egg whites, a dependable sugar ratio, and tiny water adjustments, the technique becomes far easier to control.
The original workflow stays intact here: mix the base, adjust consistency, color portions, pipe borders, flood centers, and let everything dry.
Prepare one thick base first, then divide it according to the colors and consistencies your design requires.
What Is Royal Icing and Why Is It So Special?

Royal icing combines pasteurized egg whites, confectioners’ sugar, and flavoring into a finish that dries firm.
Freshly mixed icing is smooth and glossy; after drying, it becomes a stable canvas for fine piping and layered color.
That hard finish is the key difference from buttercream or glaze, allowing decorated cookies to be stacked and packaged with fewer smudges.
It is commonly used for names, borders, snowflakes, trees, wedding favors, and other designs that need precise lines.
By adjusting only the water, the same batch can become thick outline icing, fluid flood icing, or stiff icing for raised details.
Ingredients You’ll Need

Use the ingredient table as the dependable starting formula for one batch.
| Ingredient | Amount | Purpose |
|---|---|---|
| Pasteurized egg whites | From 3 large eggs | Provides structure for uncooked icing |
| Confectioners’ sugar | 1 pound (450 g), sifted | Sweetens and thickens the icing |
| Vanilla extract | 1 teaspoon | Adds flavor; almond or lemon may be substituted |
| Gel food color | As needed | Creates concentrated color with little added liquid |
| Water | A few teaspoons, as needed | Adjusts portions of icing for flooding |
Helpful Tools:
- A stand mixer or hand mixer for building a smooth, stiff icing
- A fine-mesh sieve for removing lumps from powdered sugar
- Piping bags and round tips in sizes 2 to 4 for borders and details
- Toothpicks or skewers for guiding flood icing and releasing bubbles
- Plastic wrap to cover every bowl whenever it is not in use
Set out every tool before mixing so the finished icing is covered and exposed to air for the shortest possible time.
How to Make Royal Icing (Step-by-Step)
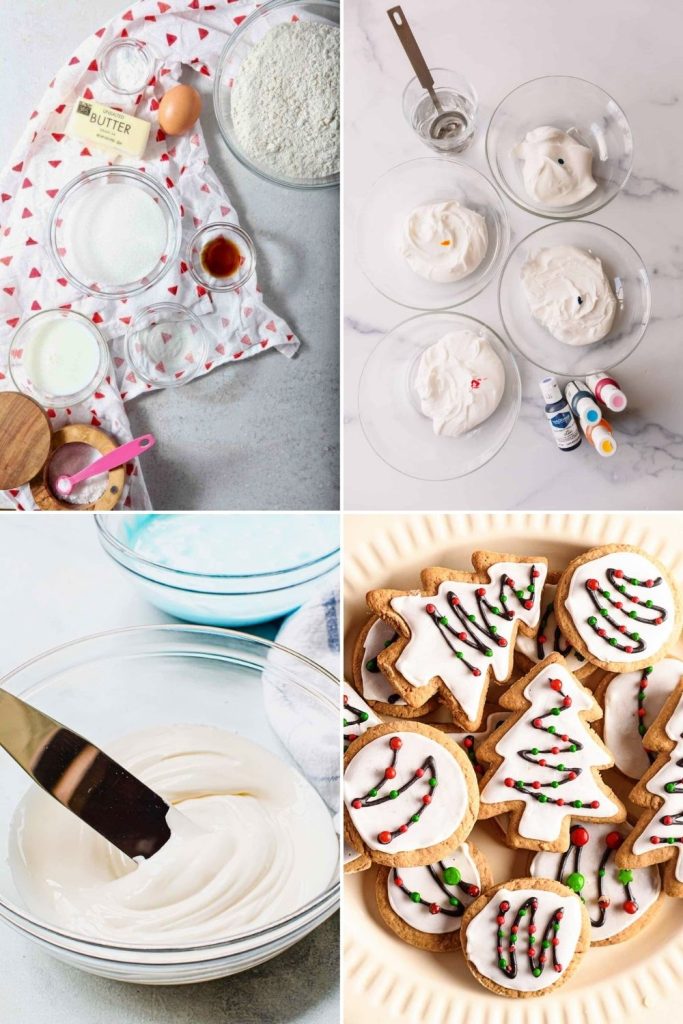
Royal icing is much easier to manage when mixing, thinning, coloring, and decorating are treated as separate stages.
These steps first create a stiff base, then thin selected portions for flooding before explaining how to apply both textures.
Begin with pasteurized whites and a bowl that is completely free of moisture and grease.
Step 1: Separate the Eggs Like a Pro
Use the whites from 3 pasteurized large shell eggs, or an equivalent amount of pasteurized liquid egg white.
Because the icing is not cooked after mixing, choose a product clearly labeled pasteurized. Any yolk or grease can also prevent the whites from foaming properly.
Crack each cold egg over a small bowl before moving the clean white to the mixer; one broken yolk will not ruin the other whites.
Pro Tip: A shell-egg separator can help, but clean hands work too. Wash hands and utensils thoroughly after contact with egg.
If pasteurized shell eggs are unavailable, use pasteurized liquid whites or a tested meringue-powder royal icing formula instead of attempting to pasteurize ordinary eggs at home.
Step 2: Whip the Egg Whites
Beat the pasteurized whites on medium in a clean, dry bowl just until foamy, stopping well before stiff peaks form.
This early foam begins the structure that will later support the powdered sugar and create a stable icing.
If the bowl has held butter or frosting, wipe it with vinegar or lemon juice, rinse if necessary, and dry it completely.
Step 3: Gradually Add the Sugar
Sift 1 pound (450 g) confectioners’ sugar first so compact lumps cannot interfere with a smooth finish.
With the mixer on low, add the sugar gradually rather than all at once, allowing each portion to blend before adding more.
Slow incorporation keeps the mixture controlled and reduces clouds of sugar around the bowl.
Once the sugar is incorporated, scrape the bowl and beat on medium-high for 3 to 4 minutes until stiff, glossy peaks stand up.
If the peaks remain soft or the surface looks dull, mix a little longer while watching the texture closely.
Step 4: Add Flavoring
Add 1 teaspoon vanilla extract, or use a small amount of almond or lemon extract.
Stop mixing as soon as the flavor is evenly blended, since excessive beating can trap bubbles in the icing.
Step 5: Check for the Right Consistency
The freshly mixed base should be thick enough to hold a piped outline. A portion will be thinned later for flooding.
Lift a spoonful and let it fall back into the bowl. Outlining icing keeps its ridge; flood icing should settle smoothly in roughly 10 seconds.
Thin only in tiny increments—about ¼ teaspoon of water at a time—and test thoroughly before adding more.
Prepare two useful textures:
- Outline consistency: Thick enough to retain a clean border.
- Flood consistency: Fluid enough to level inside that border without running off the cookie.
Step 6: Divide and Color Your Icing
Portion the icing into small bowls based on the number of colors and textures needed for your design.
For a holiday set, you might reserve extra white and prepare smaller portions of red, green, black, and orange.
Whenever a bowl is resting, place plastic wrap directly on the surface or cover it with a damp towel to block the air.
For coloring:
Choose gel food color for strong shades without adding much liquid, and fold it in gently with a spatula.
Pro Tip: A trace of black gel can mute a color that looks overly bright, but add it with a toothpick so the change remains controlled.
Step 7: Prepare Your Piping Bags
Spoon each color into a piping bag. Small round tips 2–4 suit borders and details, while tips 5–6 are helpful for flooding.
Without metal tips, cut a very small opening in a disposable piping bag or zip-top bag and test it on parchment first.
Pro Tip: Fill each bag only about one-third full for better control and less leakage at the top.
Step 8: Outline Your Cookies
Wait until the cookies are completely cool before the first line of icing is piped.
Hold the tip just above the cookie and let the strand settle onto the surface rather than dragging the metal through it.
Pipe a continuous border around the edge. This barrier contains the thinner flood icing.
Work at a steady pace, and correct small breaks before the outline begins to crust.
Step 9: Flood the Cookies
Once the border is complete, fill its center with icing adjusted to flood consistency.
Apply enough to cover the surface without creating a deep pool that can cross the border.
Guide icing into corners and pop visible bubbles with a toothpick or skewer.
Leveling Tip: Move the cookie very gently from side to side to help the wet icing settle into an even layer.
Step 10: Add Decorations
When the flooded base looks smooth, begin adding the decorative elements in your planned order.
For ornaments or polka dots, let the flood coat set for 15 to 30 minutes before piping a contrasting color.
For snowmen, wait until the white surface has begun to firm, then add eyes, buttons, scarves, and noses with a fine tip.
Add sanding sugar while the surface is still wet so the crystals stick securely and catch the light.
Pro Tip: Build dimensional designs in stages, allowing one layer to set before adding the next to limit bleeding and dents.
Step 11: Let Them Dry Completely
Drying time is an essential step, so reserve a protected space where the cookies can remain untouched.
Leave them in one layer in a cool, dry room for 6 to 8 hours, ideally overnight.
The icing is ready when the surface looks matte, feels completely hard, and does not mark under a light touch.
Once dry, stack the cookies with care or package them in boxes, cellophane bags, or airtight containers.
Tips for Royal Icing Decorating Success

Good royal-icing results rely just as much on preparation and timing as they do on piping technique.
These habits make the process cleaner and more consistent:
1. Plan before piping. Royal icing starts crusting as soon as air reaches it, so decide on colors, tips, and layers first.
2. Cover every bowl. Place plastic wrap directly against the icing surface whenever you pause.
3. Test the flow. Pipe a short line or small pool on parchment and adjust the consistency before touching the cookies.
4. Separate wet layers. Let one color set before adding another when crisp borders matter.
5. Work with small imperfections. Sanding sugar, sprinkles, or another detail can disguise an uneven line without overworking it.
6. Prefer gel colors. They create stronger shades without thinning the icing as much as liquid coloring.
A little organization removes the rush and gives you far more control over the finished designs.
Flavor Variations to Try

Vary the flavor by swapping or blending extracts, keeping the combined amount restrained so it does not weaken the icing.
The table below suggests flavors for holidays, weddings, spring cookies, and other themes.
| Flavor | Character | Good For |
|---|---|---|
| Vanilla | Familiar and softly sweet | All-purpose and Christmas cookies |
| Almond | Lightly nutty and aromatic | Wedding favors and elegant sugar cookies |
| Lemon | Bright and tangy | Spring and Easter designs |
| Peppermint | Cool and festive | Snowflakes and Christmas cookies |
| Orange or Citrus Zest | Fresh citrus aroma | Summer and fruit-themed cookies |
| Coconut | Mild tropical flavor | Beach and summer-party designs |
| Maple | Warm and cozy | Autumn and Thanksgiving sets |
| Vanilla and Almond | Balanced bakery-style flavor | Everyday decorating and gifts |
Pro Tip: Begin with a few drops, especially when using almond or peppermint extract, then taste before adding more.
Serving Ideas

Firm-drying royal icing suits celebrations throughout the year, not just Christmas.
- Holiday gatherings: Serve snowflakes, trees, or stockings, or use labeled cookies as edible place cards.
- Weddings and showers: Wrap pastel or monogrammed cookies individually as favors.
- Birthdays and children’s parties: Choose bold colors, names, numbers, or themed shapes.
- Seasonal events: Decorate hearts for Valentine’s Day, eggs for Easter, or leaves and pumpkins for autumn.
- Gifts: Arrange fully dried cookies in a lined tin or festive box.
The decorated cookies can also become cupcake toppers, cake accents, or part of a larger dessert board.
Because the icing dries firm, the cookies can be prepared ahead and transported more easily than treats with soft frosting.
Royal Icing vs. Buttercream: What’s the Difference?
Although both frost desserts, royal icing and buttercream solve different problems: royal icing sets hard for detail work, while buttercream stays soft on cakes and cupcakes.
| Feature | Royal Icing | Buttercream |
|---|---|---|
| Main Ingredients | Pasteurized egg whites and confectioners’ sugar | Butter and confectioners’ sugar |
| Texture | Flows when wet, then dries firm | Soft, creamy, and spreadable |
| Finish | Smooth and matte when completely dry | Soft with a velvety appearance |
| Best Uses | Cookies, fine lines, borders, and edible details | Cakes, cupcakes, fillings, and swirls |
| Storage Approach | Keep unused icing covered; dry decorated cookies before packaging | Refrigerate when required by the recipe |
| Stackable? | Yes, after a full dry | No, the surface can smudge |
| Flavor Options | Vanilla, almond, citrus, or peppermint | Many butter-, chocolate-, fruit-, and spice-based variations |
Final Thoughts
Royal icing gives an ordinary cutout cookie a smooth surface that can support anything from a simple border to a personalized illustration.
Adapt the colors and textures for weddings, birthdays, Christmas, or a casual weekend decorating project.
Fill the bags in advance, add details in planned layers, and allow a complete overnight dry before stacking or gifting.
Easy Royal Icing
You’ll Love These Next
When the decorated cookies are finished, continue with the linked FeastBears baking ideas below.
- 🍫 Best Chocolate Crinkle Cookies Recipe for Winter – Bake fudgy cocoa cookies with a dramatic powdered-sugar coating.
- 🎉 Easy 35-Min Magic Cookie Bars Recipe for Parties – Layer graham crumbs, coconut, chocolate, and condensed milk in one pan.
- 🎄 Cozy Buttery Spritz Cookies Recipe for Christmas – Press tender butter-cookie dough into traditional holiday shapes.
Together, the three recipes add deep chocolate flavor, chewy layers, and delicate buttery crunch to a festive tray.
Bake one next, or combine all three with your royal-iced cookies for a varied holiday assortment.

Dana Brooks is a home-cooking writer at Feastbears, where she shares easy family recipes, cozy dinners, quick desserts, and beginner-friendly kitchen tips. Her goal is to make everyday cooking feel simple, warm, and enjoyable for busy home cooks.


