Holiday baking can be joyful and hectic at the same time, and these bright green Grinch Cookies bring an easy dose of fun to the cookie tray.
Each soft vanilla cookie wears a snowy crinkle coating and one red heart, creating the familiar look with very little decorating.
That green, white, and red finish gives the batch plenty of character while keeping every step approachable for home bakers.
With no long chilling step, you can mix, shape, and bake them in under 30 minutes for a party, gift box, or family activity.
Why You’ll Love Grinch Cookies
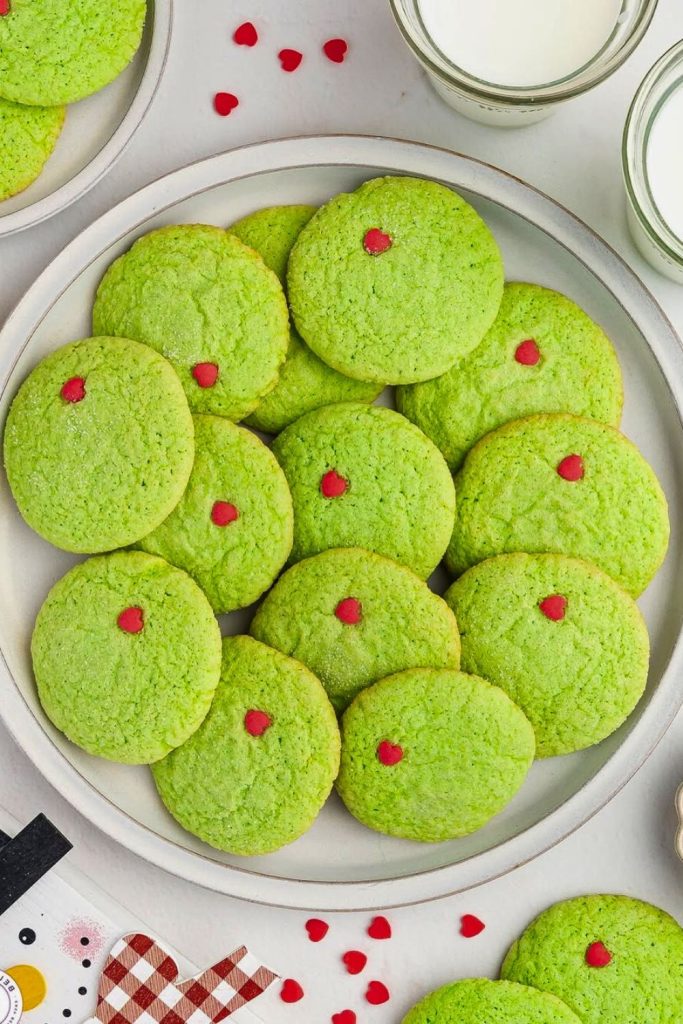
Vivid green dough and a tiny red heart make Grinch Cookies instantly recognizable among traditional holiday treats.
Powdered sugar keeps the centers tender, and cornstarch in the outer coating encourages the bold white cracks that appear during baking.
The quick method suits a busy afternoon, and children can easily help roll, coat, and decorate the dough.
Serve them during a holiday movie, trade them at a cookie exchange, or wrap a few as cheerful homemade gifts.
These are the features that make the recipe especially dependable:
- Fast and Simple: The dough does not need a long chill, so the cookies can be ready in under 30 minutes.
- Festive Appearance: Green cookies, a snowy coating, and red hearts create an easy Christmas theme.
- Soft Texture: Powdered sugar and cornstarch help the baked centers stay tender.
- Popular with All Ages: The vanilla flavor and cheerful design appeal to both children and adults.
- Easy to Gift: Once cooled, the cookies pack neatly and remain soft for several days.
At heart, this is a simple vanilla cookie dressed up with a playful Christmas color scheme.
Ingredients You’ll Need

You will combine the dry ingredients, a butter-and-egg mixture, the snowy coating, and red heart decorations; measuring first keeps the process moving smoothly.
| Category | Ingredient | Amount | Purpose |
|---|---|---|---|
| Dry Ingredients | All-purpose flour | 2½ cups (300 g) | Provides the main structure. |
| Powdered sugar | 2 cups (240 g) | Sweetens the dough and helps keep it tender. | |
| Baking powder | 1 tablespoon | Gives the cookies lift and a soft texture. | |
| Salt | ½ teaspoon | Balances the sweetness; fine sea salt works well. | |
| Wet Ingredients | Unsalted butter, softened | ½ cup (1 stick) | Adds richness and moisture. |
| Eggs | 2 large | Bind the dough and provide structure. | |
| Vanilla extract | 1 tablespoon | Adds the primary flavor and aroma. | |
| Green food coloring | A few drops, as needed | Creates the vivid holiday color. | |
| Coating | Cornstarch | ½ cup (56 g) | Helps control spreading and keeps the coating dry. |
| Powdered sugar | ½ cup (60 g) | Forms the visible white crinkle pattern. | |
| Decoration | Red heart candies or sprinkles | As needed | Add one to the center of every warm cookie. |
Optional Twist: Replace the food coloring with 1–2 teaspoons of matcha for a naturally green cookie with a gentle earthy note.
Step-by-Step Guide to Making Grinch Cookies

The instructions retain the full original order, from preparing the baking sheets through cooling and storage.
For soft centers and sharp crinkles, keep the dough pliable, coat it generously, and avoid extending the baking time.
Step 1: Preheat and Prepare
Preheat the oven to 350°F (175°C) before mixing so the shaped cookies can go straight into steady heat.
Cover two large baking sheets with parchment to prevent sticking, promote even baking, and simplify cleanup.
Why it matters: Prepared pans let you bake immediately, preventing the finished dough from sitting too long and becoming overly soft.
Step 2: Mix the Dry Ingredients
In a large mixing bowl, whisk together:
- 2½ cups (300 g) all-purpose flour.
- 2 cups (240 g) powdered sugar.
- 1 tablespoon baking powder.
- ½ teaspoon salt, preferably sea salt.
Whisk for 30–60 seconds, breaking up lumps while spreading the leavening and salt evenly through the flour.
Pro Tip: Sea salt has a clean flavor, but any fine salt works when measured accurately.
Step 3: Add the Butter
Add ½ cup (1 stick) softened unsalted butter to the dry mixture.
Cut the softened butter into small pieces, then work it through the dry mixture until the texture is sandy and holds when squeezed.
Texture Check: The mixture should be crumbly but should hold together when you squeeze a small amount.
If you use salted butter, reduce the additional salt by about ¼ teaspoon.
Step 4: Prepare the Wet Mixture
Break the two eggs into a separate bowl first, making it simple to catch any shell before the wet ingredients reach the flour.
Add the following to the eggs:
- 1 tablespoon vanilla extract.
- Enough green gel or liquid food coloring to reach a vivid shade.
Whisk until the eggs are fully blended and the color is uniform, with no darker streaks.
Coloring the liquid mixture first gives the finished dough an even shade without requiring extra mixing after the flour is added.
The mixture should look smoothly green before you combine it with the dry ingredients.
Step 5: Combine Wet and Dry Ingredients
Pour the evenly green egg mixture into the bowl with the butter and dry ingredients.
Mix on low just until most of the loose flour disappears.
Use a spatula for the final folds, stopping as soon as the dough is evenly colored and free of dry pockets.
Color Check: Look through the dough for pale flour streaks, but stop mixing as soon as they disappear.
For the matcha option, omit the food coloring and blend 1–2 teaspoons matcha into the dry ingredients, noting that it changes both the shade and flavor.
Step 6: Make the Coating
In a small, shallow bowl, combine:
- ½ cup (56 g) cornstarch.
- ½ cup (60 g) powdered sugar.
The cornstarch mixture makes the soft dough easier to handle and forms the cookies’ snowy, crackled shell.
How it works: Cornstarch helps limit spreading, while the powdered sugar separates into visible white cracks as the dough expands.
Apply a generous coating to every side; sparse patches will not develop the same dramatic white cracks.
Step 7: Shape the Cookies
Portion the dough with a medium scoop or spoon, aiming for 1½ tablespoons, or about 35 grams, per cookie.
Roll every portion gently between your palms until it forms a smooth ball.
Roll each ball through the cornstarch and powdered sugar until a thick white coating covers the entire surface.
If the dough sticks: Dust your palms lightly with the coating mixture before rolling the next portion.
Step 8: Arrange on Baking Sheets
Set the coated balls about 2 inches apart on the parchment-lined pans so they can spread without touching.
Press the top of each ball very lightly with your fingertips to encourage even spreading and visible cracks.
Optional: For a slightly taller cookie, freeze the shaped balls for about 5 minutes. Do not chill too long, or the dough may not spread and crinkle properly.
Step 9: Bake to Perfection
Bake at 350°F for about 12 minutes, using the appearance of the edges and centers to judge doneness.
Use these visual cues to check doneness:
- The tops should have distinct white cracks.
- The edges should look set while the centers remain soft.
- The bottoms should be only lightly golden rather than brown.
Take the cookies out while the centers still look a little soft; they will finish setting from the tray’s residual heat.
Baking Tip: For the most even results, bake one sheet at a time on the center rack and rotate it halfway if your oven browns unevenly.
Step 10: Add the Heart Decoration
As soon as the pan leaves the oven, gently press one red heart into the center of every warm cookie.
Suitable decorations include:
- Red cinnamon heart candies.
- Heart-shaped red sprinkles.
- Red candy-coated chocolates or sugar pearls.
The warm surface softens the decoration just enough to help it adhere as the cookie cools.
Design Tip: Press only until the heart sits securely in the surface; pushing too deeply can crack the soft center.
Step 11: Cool and Store
Transfer the cookies to a wire rack and let them cool all the way through before storing.
Keep cooled Grinch Cookies airtight at room temperature for up to one week, or freeze them when you need longer storage.
For the best texture:
- Place parchment between stacked layers so the sugar coating does not stick.
- To freeze, first arrange the cooled cookies in a single layer. Once firm, transfer them to a freezer-safe bag or container for up to 3 months.
Thaw frozen cookies at room temperature before serving so the centers return to their soft texture.
Pro Tips for Perfect Grinch Cookies

Although the recipe is beginner-friendly, a few details make the green color more even, the spread more controlled, and the crinkles cleaner.
Keep these points in mind before baking the full batch:
- Measure Accurately: A kitchen scale is ideal because too much flour or sugar changes the way the cookies spread.
- Tint the Wet Ingredients: Mixing the color into the eggs first prevents streaks and reduces unnecessary mixing after the flour is added.
- Soften, Do Not Melt, the Butter: The butter should be pliable but not greasy; melted butter can make the cookies spread too far.
- Use a Generous Coating: A thick, even layer of powdered sugar and cornstarch produces the strongest snowy contrast.
- Do Not Overbake: Take the cookies out when the edges are set and the centers still look soft.
- Bake a Test Cookie: One test portion reveals whether the dough spreads properly and whether the green color is strong enough.
- Cool Before Storing: Packing warm cookies traps moisture and can make the coating sticky.
Following those points produces tender holiday cookies with a consistent green interior and clearly defined snowy cracks.
Flavor Variations to Try
| Variation | Add or Replace | Result |
|---|---|---|
| Lemon Grinch Cookies | Add 1 teaspoon lemon extract or fresh zest. | A bright citrus note that cuts through the sweetness. |
| Peppermint Grinch Cookies | Add ½ teaspoon peppermint extract. | A cool, classic holiday flavor alongside the vanilla. |
| Matcha Grinch Cookies | Replace the coloring with 1–2 teaspoons matcha powder. | Natural green color with a mild earthy taste. |
| White Chocolate Chip Grinch Cookies | Fold in ½ cup white chocolate chips. | Creamy pockets of extra sweetness. |
| Almond Grinch Cookies | Add ½ teaspoon almond extract. | A deeper bakery-style aroma. |
| Sprinkle-Topped Grinch Cookies | Add holiday sprinkles before baking. | More color and a light crunch. |
| Gluten-Free Grinch Cookies | Use a cup-for-cup gluten-free flour blend. | A gluten-free version with a similar soft texture. |
Every variation keeps the basic soft crinkle format while changing the flavor, the green coloring, or the added mix-ins.
Serving Ideas

Their bold holiday colors make Grinch Cookies easy to feature on platters, at parties, or in gift boxes.
- Holiday Cookie Platters: Place them beside red, white, or chocolate cookies for a colorful contrast.
- Gift Boxes and Tins: Separate layers with parchment and finish the package with a red ribbon or festive tag.
- Party Favors: Seal individual cookies in clear bags and tie them with holiday twine.
- Children’s Decorating Activity: Let kids choose the heart decorations or add extra sprinkles during a family baking session.
- Dessert Table Display: Arrange the cookies on tiered stands or trays with simple seasonal decorations.
Whether the setting is a quiet movie night or a crowded celebration, the green cookies and red hearts bring a playful focal point.
Pairing Ideas: What to Serve with Grinch Cookies

Pair the vanilla flavor with a warm drink or surround the cookies with other festive sweets:
- Hot Cocoa or Peppermint Mocha: Chocolate and mint both complement the sweet vanilla dough.
- Eggnog Latte: Its creamy spice pairs well with the soft sugar-cookie texture.
- Warm Cinnamon Milk: A simple, mild option that works especially well for children.
- White Hot Chocolate: The pale drink makes the green cookies stand out on a dessert table.
- Other Holiday Cookies: Combine them with spritz cookies, chocolate crinkles, thumbprints, or gingerbread for variety.
Serve them with one favorite drink or build a larger dessert spread; the bright design makes the holiday theme effortless.
Final Thoughts
Grinch Cookies transform straightforward vanilla dough with green color, a powdery crinkle shell, and a single red heart.
Since the dough needs no extended chill, this batch fits naturally into family baking days, exchanges, parties, and homemade gifts.
Measure accurately, mix only as needed, pull the cookies before they overbake, and attach the hearts while the centers are warm.
Soft Grinch Cookies

You’ll Love Baking These Next
Use the three clickable FeastBears recipes below to continue the same holiday baking plan.
- Easy 35-Min Magic Cookie Bars Recipe for Parties — Chewy layers of graham cracker, chocolate, and coconut make an easy party dessert.
- Cozy Buttery Spritz Cookies Recipe for Christmas — Classic buttery dough is pressed into decorative shapes for a traditional cookie tray.
- Easy 10-Min Royal Icing Recipe for Cookies — A smooth, glossy icing designed for decorating holiday cookies.
Together, the linked treats bring several colors, textures, and flavors to one complete Christmas cookie platter.


Dana Brooks is a home-cooking writer at Feastbears, where she shares easy family recipes, cozy dinners, quick desserts, and beginner-friendly kitchen tips. Her goal is to make everyday cooking feel simple, warm, and enjoyable for busy home cooks.


